Grocery List:
- JB Weld or Loctite GAS IMPERVIOUS weld stuff. I used the kind you mix together.
- Loctite Epoxy Weld Stick
- Dremel or Sears ,in my case, rotary tool
- Sanding head for tool
- WD40
- 1/2" (I think) hose coupler
- Correct size Flathead and Phillips screwdrivers
- Gasket for upper to lower intake manifold. (Got mine from MazdaTrix)
Procedure:
- Make sure your car is cool and drain some of your coolant. It will still make a bit of a mess when you take the hose off but oh well.
- Take off intercooler if you have a turbo.
- Remove throttle/cruise control cable bracket. You can remove them while they are still connected to the bracket. This will make it a little easier when you put things back together.
- Loosen hose from turbo to intercooler and from coupler to BAC valve.
- Take hose from coupler off of BAC valve.
- Disconnect the coolant hose from BAC to throttle body at the point where it conencts to the TB.
- Disconnect AWS thing on top of upper intake manifold.
- Remove various other hoses near throttle body and make sure you remember where they go.
- Remove bolts holding the upper intake manifold to the lower intake manifold. There should be 4 12mm nuts and 1 12mm bolt. There may also be a 12mm nut on the end of the TB elbow-intercooler pipe. You will just have to loosen this, not remove it.
- You should now be able to take off the upper manifold and throttle body as one piece. When you are removing it you will notice a coolant return line below the TB that you will have to disconnect when you take out the upper manifold and TB. The easiest way to remove this line is hold the whole upper manifold up and then unclip the hose from the TB first.
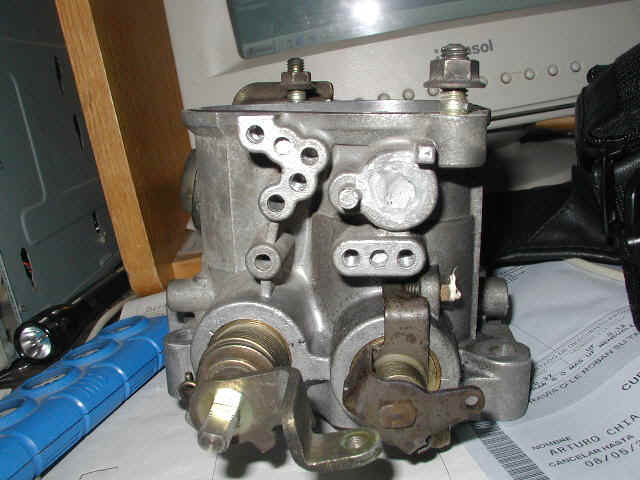
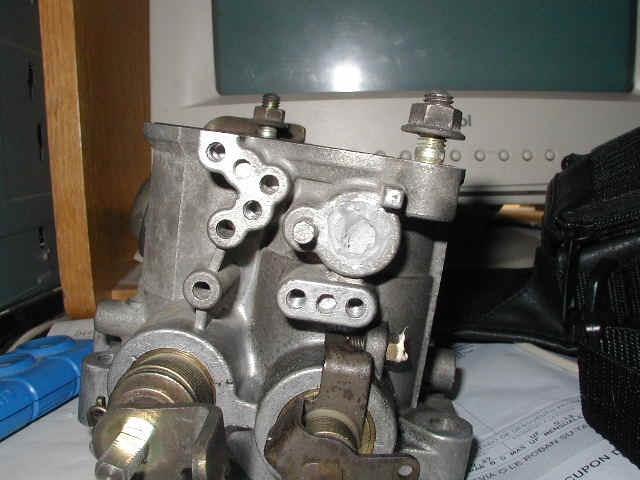
- Now remove the upeer manifold from the TB.
- Remove all stuff connected to the TB and manifold.
- You can use some carb cleaner to clean out the manifold if you would like but I tried and couldn't clean it too well.
- Remove the TPS.
- Now just start removing things, thermowax and all of its components, and those circular shaped damper thingies (Dashpots). You do not have to remove the dashpots but all they are there to do is to stop the throttle from snapping shut which is bad for emissions because of the unburt gasses but I like the response with them off.
- You should now have the primary and secondary plates, two dashpot brackets, and the small spring that controls the secondaries left on the TB.
- At this point if it is crudded up you can do what John V. suggested and put the TB into a bucket with carb cleaner or something and let it sit overnight or...Spray a hell of a lot of WD40 on every screw you can find a eat lunch or something. Depending on the age and cleanliness of the TB you may not have to wait. On my 1993 Cosmo TB I just took the screws right off in the next step..
- Now find an EXACT fitting flathead, that's what I used, for the secondary plates. (The secondaries are the two that don't have another plate above them.) They WILL strip if you are not careful. I used ALL of my weight while turning the screws. I also wedged a screwdriver by the linkage to stop the plates from moving.
- Once you get the screws out rejoice and then take out the plates. You now have a bar with a slit going down the middle.
- Pull the bar right out with the linkage and spring attached. The plates were holding it in.
- Now take off the damper brackets with the correctly sized screwdriver. I used the ratchet-with-socket-on-the-screwdriver technique for some SERIOUS torque. I had to push down REAL HARD while twisting to get these things off.
- Now that you have everything off you will need to make sure it is very clean in the holes and dry thoroughly.
- The reason you have a weld STICK and weld PUTTY is because the stick does not harden as much and is not impervious to gas. You will see in the next steps how I made it work.
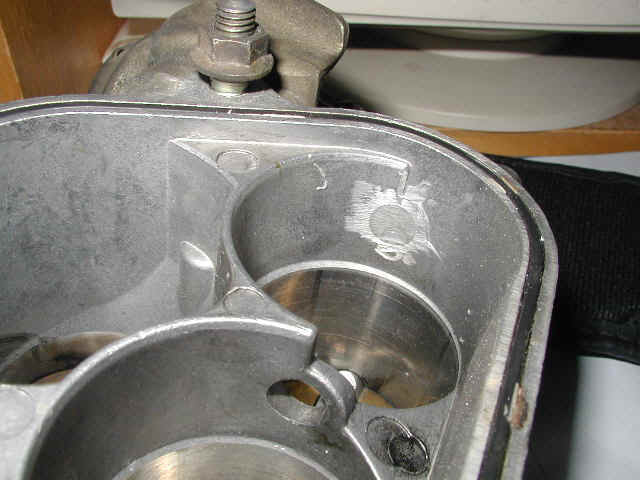
- Cut a small slice of the weld STICK with a plastic, or cheap, knife. work it with you fingers and fill both of the holes about 1/2 to 3/4 of the way full. Let dry for 20-30 minutes if possible but the next step should work without drying. UPDATE: You do not have to let it dry for very long at all. Maybe 5 minutes but it will still be safer if you let it sit for 20 minutes.
- Open the two weld bottles and follow the directions. You just need enough to fill the remainder of the holes with a little excess showing. Let dry for 24 hours to be safe but I recently did my 1993 TB with only about 4 hours of drying.
- Use your roto tool, or whatever works, and sand smooth the excess.
- Make sure that NO light is shining through the plates when you hold it up to the light. If there is you can adjust it with a screw.
- You are done modifying your TB. Now put things back together.
- Take the hose that comes from the BAC that USED to go to the TB and put the coupler into it. Find the hose that comes from the engine that USED to go to the bottom of the TB and connect it to the coupler. I ran it under some hose down there but I'm sure you can make it fit however you like.
- Now put everything back together EXCEPT the intercooler.
- Loosen the idle screw until the metal tab just touches it and then screw it in 1 or 2 turns. You will have to re-adjust your idle but oh well.
- VOILA! You know have a better responding car and when you need to change something under the TB it is as easy as unscrewing the VDI and lifting it up. Pretty much anyway.
PICTURES: