|
Home
Mods
My Car
Gallery
How To
Racing
Dyno
Multimedia
Links
Proj. Cosmo
Nate Bowen
Arturo Chia
Old Updates |
NOTE: This is for a 1990 Turbo. Other years may vary. All pictures are from Yosuke in Japan. He is a very nice guy.
Grocery List:
- A way to jack your car up, be it a lift or jack and jack stands
- A way to get your wheels off
- Needle nose pliers
- 1/4" drive 8, 10mm
- 1/2" drive 12, 14 mm
- 3/4" drive 17 mm and a socket that will fit over the #4 screwdriver (This will give you a TREMENDOUS amount of torque)
- 1-2 feet of 4mm silicone, rubber, whatever hose
- Big slip locking wrench, I think that is what they are called
- #4, I think, Phillips head screwdriver. It needs to be big.
- I had 5 pints of NEO brake fluid to make sure I had enough to bleed the whole system.
- Front and rear rotors and pads. I used Power Slot rotors in the front and stock in back with Hawk HPS Plus all around.
Procedure:
- Start by jacking up, or lifting, the car. I jacked up all corners and placed jack stands underneath. I used the rear trailing arms to support the rear and my roll cage support to support the front.
- Remove all 4 wheels.
- Now you will need to loosen the rotor but ONLY IF YOU ARE CHANGING THEM!. Take the big Phillips screwdriver and find a 3/4" drive socket that will fit over the handle. Now set the wrench to loosen and have your friend step on the brakes, or set the parking break. Make sure you do not strip the screw and put a lot of pressure on the head of the wrench and twist. It should come loose. Do the same on all of the rotors and don't worry if you break a head off one of the screws because you can get the rotor off with a broken screw. When you have the rotors loose release the breaks and/or DISENGAGE parking brake! You will not be able to remove the rear caliper with it engaged, gee I wonder how I know..
- You will see a 12 mm bolt with a rubber boot on it at the bottom end of the caliper near the brake pads. Loosen this bolt and slide it out as far as possible. You will now be able to swing the caliper up and remove the pads.
- With the caliper swung up, you can now replace the pads and you will have to twist the piston with a needle nose pliers to get it to move inward so it will fit over the new pads.
- That is all you have to do to change the pads.
- (Changing Rotors)
- Now you will see two bolts holding the ENTIRE caliper assembly onto the control arm. I didn't remove my calipers because I didn't change the rotors but they should be 17mm bolts.
- Remove both bolts and you should be able to pull the caliper assembly out of the way.
- With the caliper assembly out of the way and the rotor loose, pull the rotor off and replace with the new one.
- Now replace the 2 17mm bolts to hold the caliper assembly on.
- You can now place the brake pads into the slots. There is no specific direction for them so use any of them.
- Now, in order to move the pistons you will need the needle nose pliers. There will be two indentations on the piston itself where you will put the pliers onto. You may have to try a few times but you should be able to screw the piston in just like any other screw. You will have to screw it in far enough so it will fit over the new rotors and pads. This may be quite a bit if your brakes were very worn.
- Now swing the caliper and piston down and put the 12mm bolt back in.
- Repeat on the other side.
- (End Changing Rotors)
FRONT:
- Okay, these brakes are WAY cool! They are 4 piston and the brake pads you can access WITHOUT TOOLS! (Theoretically)
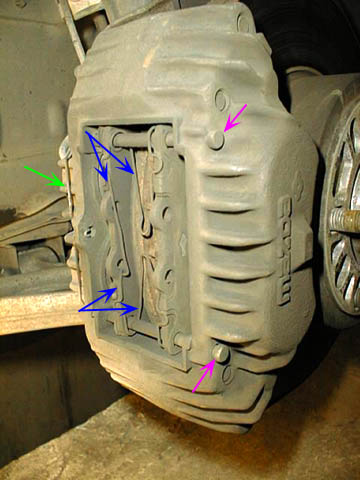
- First remove the springs and REMEMBER THE ORIENTATION OF THEM. Also, when removing them make sure to have a good grip! The long wire holding the pins in shot away from me and it took 20 minutes to find the stupid thing. Picture of caliper with springs. (The yellow arrow points to the wire that holds the spring in. This is the one that shot off. The blue arrows point to the brake pad springs, not sure what they do. The purple arrows point to the pins that hold the brake pads in place.) Close up of spring holding pins in.
- Take the slip lock pliers and squish the pads into the pistons in order to give you clearance for the new pads and rotors. See here what I am talking about.
- Once you have depressed the pistons you will be able to pull the pads out.
- Replace pads with new pads and put things back together.
- (Changing Rotors)
- Now there will be 2 17mm bolts holding on the caliper. Unscrew these and make sure to hold the caliper because it had a hard line going to it and you can easily bend it.
- It is easiest if someone is holding the caliper so you can remove the rotor. Mine was on there very tightly so I had to stick a wrench between the rotor and the shock and pry it loose.
- Remove the rotor and replace with new one.
- Replace 17mm bolts.
- You may have to depress the pistons ever more to get them to fit but they WILL fit. Also, my Hawk HPS Plus pads had a little tab on two of them. THESE GO ON THE INSIDE OF THE CALIPER.
- Replace all springs.
- Repeat on other side.
- Now screw in the screw that holds on the rotor. There were 2 on my Stillen rotors but only 1 on my Power Slot so you make the call. You may have to have your friend hold the brakes to get enough torque to screw it in.
- (End Changing Rotors)
- Follow break-in procedure from the manufacturer.
- It is recommended that you change your brake fluid now.
|